
I am embarrassed that I have not posted this information before now. Besides creating a Shadow Copy, which is a post I plan to update later today, this is one of the most needed How-to’s I can think of. I honestly thought I had posted this previously, but a search through the site tells me I hadn’t.
Here’s what you’ll need to get this process accomplished:
- The old computer that has your original Memory Vault on it (either in Memory Manager or Historian). This computer still needs to be able to run to make this work.
- OR, if you already have an up-to-date Shadow Copy on an external drive, you don’t need to worry about the old computer.
- An external hard drive for the transfer with enough free space to hold your Vault.
- The new computer running an activated version of Historian with enough room to hold your Memory Vault when it’s transferred.
Step One: Create/Update Shadow Copy on the Old Computer
To make certain that you are transferring the most recent version of your Memory Vault to the new computer, you need an up-to-date Shadow Copy. If you have never set one up before, start now by plugging the external drive into the old computer and starting Historian. (If you are using Memory Manager 4 on the old computer, it will look very similar to the following screenshots. If you are using Memory Manager 3.0, use the instructions in this post: https://debsdigitaltips.com/setting-shadow-copy/)
Once Historian is open, click on the Vault tab on the top menu ribbon and select Shadow Copy.
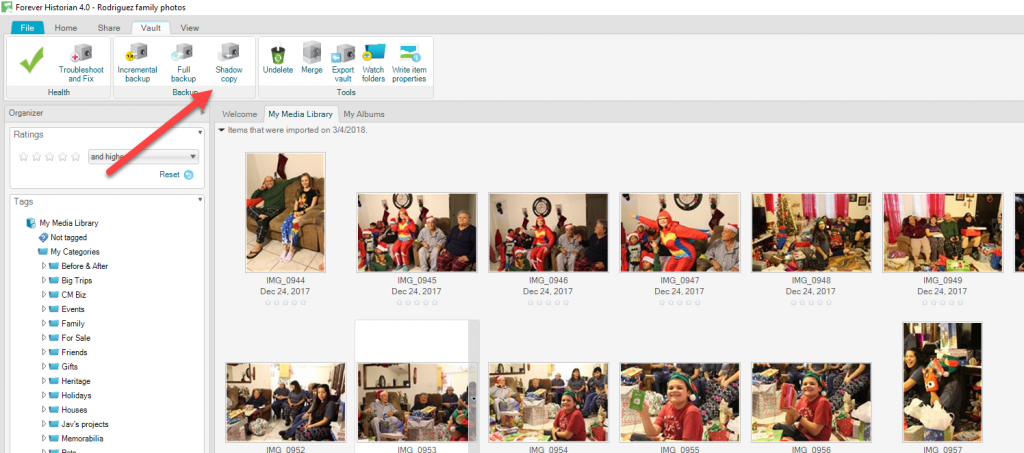
If you already have a Shadow Copy set up to work with your external drive, you should see something like this:
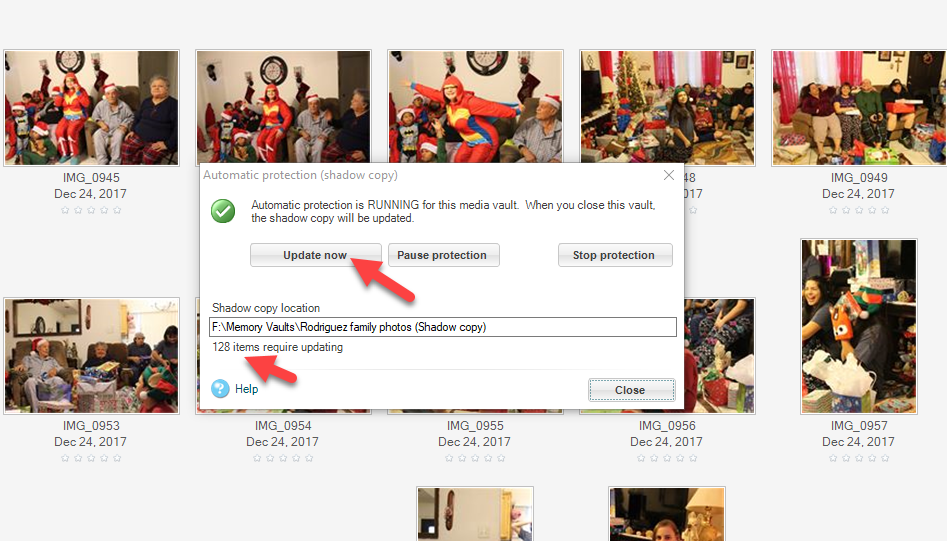
If you don’t have a Shadow Copy set up yet, instead of an Update Now button, you will see a Start Protection button. Click on that, and then follow the steps in my previous post on Setting Up A Shadow Copy.
As you can see, I had 128 photos that needed to be updated on my Shadow Copy. All that means is that I made changes to some photos and/or added some photos and my external drive wasn’t plugged in at the time that I did that, so I need to update. My favorite thing about the Shadow Copy feature is that if I do have the external drive plugged in when I close Historian, it will automatically check to see if the Shadow Copy needs to update and perform that update before it fully closes. That’s a super easy way to make sure things are backed up.
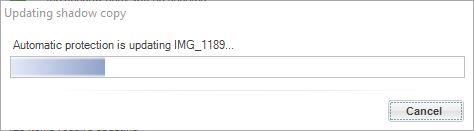
So, while the Shadow Copy is working, I see a progress bar like this:
and when it’s finished, I’ll see this box. Note down below the location that it verifies that No items require updating. That means we’re good to move on.
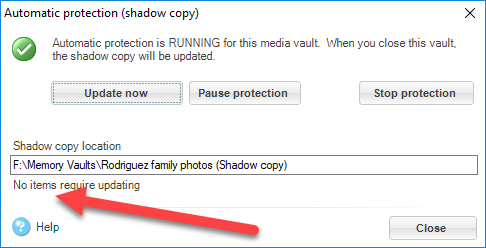
So go ahead and click Close, and then close Historian/Memory Manager on the old computer. To disconnect the external drive, please, pretty please don’t just unplug it from your computer. This abruptly shuts down the spinning disc in there, and that could cause damage to your files.
Instead, please Safely Remove your external drive. That’s actually a thing. Go down to little carat/arrow in the System Tray (bottom right) of your computer screen and click on that arrow. You’ll get all sorts of fun icons that pop up, probably at least something like this:
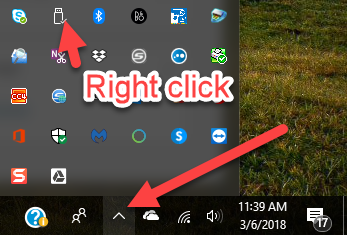
Find that little white USB drive-like icon that the arrow points to in my picture above and right click on it. That will open a box that lists any removable drives you have connected to your computer. In my case here, I only have one. If you have more than one, make sure you pick the right one, or you’ll have to reconnect whatever you select.
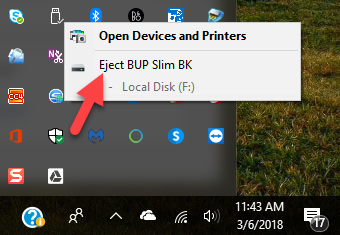
Go ahead and click on that drive and then wait for a notification that it’s safe to remove the drive.
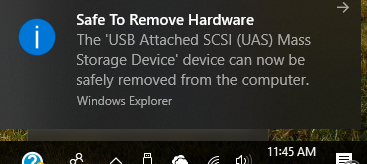
If you get a different message that says that the drive is still in use, try the process of safely removing the drive one more time. If it still persists, either try shutting down your old computer (if you don’t need it anymore at the moment) and then unplug your external drive. Or, it won’t be the end of the world if you go ahead and unplug after a few tries. At least, so I’ve been told by IT guys before.
Step Two: Restoring Your Memory Vault on the New Computer
We’re almost done, I promise! This is the good part.
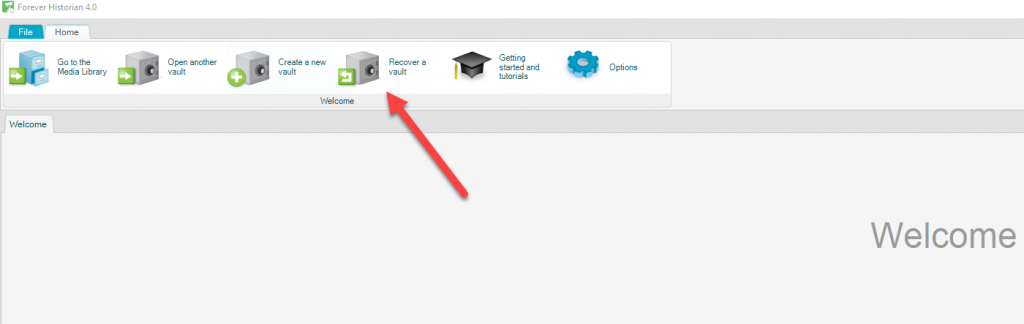
On your new computer, open Historian. If it’s the first time you’ve opened Historian, it is probably asking you where you want to set up your new Memory Vault. Just cancel out of that because we’re going to designate a location for your Vault when we start this process.
Plug in the external drive that holds your Shadow Copy, and then from the Welcome screen in Historian, go to the icon that says Recover a vault.
This next box is important. You first want to click on the three little dots “…” on the right side of the box that says “New location for the recovered media vault”.
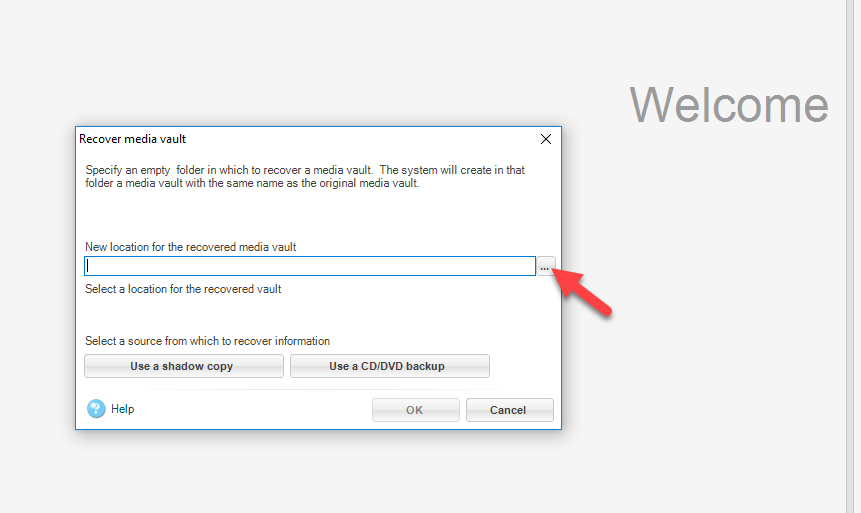
Clicking the … will open a box to let you choose where on your new computer you want to keep your Memory Vault. I highly recommend creating a folder in your Pictures library to house your vault. If for some reason down the road your hard drive fails and you don’t have a Shadow Copy (please, please have a Shadow Copy) and you take your computer to the tech guys at the store, they will try to recover files from Pictures and Documents by default, so you’re more likely to get your photos back.
Now, once you choose your new vault location, you’ll notice that the OK button is still grayed out. That’s because we have to choose one of those buttons in the bottom section of the box to tell it what source to use to bring in the old vault. Here, you want to chose Use a Shadow Copy. That will open another box that asks you to find your Shadow Copy.
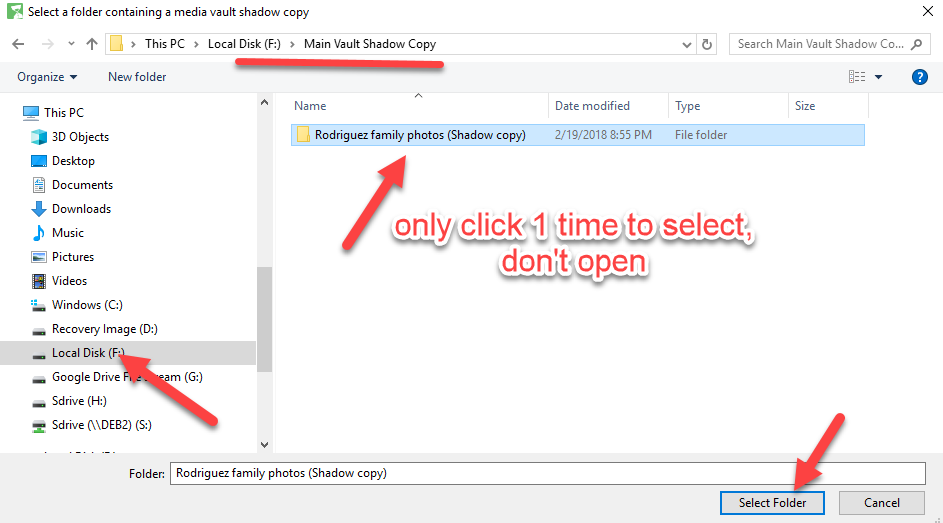
Navigate to the external drive (in the list on the left-hand side of the screen) to open the files on that drive, and then navigate to the folder that holds the Shadow Copy you just created. Mine was in a folder called Main Vault Shadow Copy, and inside it you see a file with my vault name and (Shadow copy) in parenthesis. This part is important: make sureto just click that file folder one time to select it and then click the Select Folder button below. If you double-click the Shadow copy folder above, it takes you into the structure of the Shadow Copy, and that won’t work.
Now you’ll notice that the OK button is highlighted and you can click it. Go ahead and do that now.
Depending on how big your vault is, this could be quick, or it could take quite a while. Just relax, go read a book or do something else and let it do it’s thing. You really don’t want to interrupt this part of the process. That Shadow Copy is carefully reconstructing your whole Memory Vault just the way you left it, but on your new computer. Which is why this Shadow Copy thing is so awesome. I just love it!
I really hope this has helped! Don’t forget to restart that Shadow Copy once you get your vault fully recovered. Let me know if you need help.

Hi Deb,
I live in Melbourne, Australia and I am having great trouble locating my old saved vault.
I originally purchased Memory Manager many years ago, and then Historian 4 which I have on my current computer. I had a big gap of quite a few years where I didn’t use the program as my life got busy and the kids more demanding. I probably changed computers a few times too.
Unfortunately, I can’t find my old saved file/vault and I am devastated!!!!
I have turned on all my old computers (some won’t even turn on) and I have had no luck. I have always backed up my files before importing to a new computer but I just can’t seem to find it. Can you please advise what type of file I should be looking for? I have been searching for “vaultx” files. I have also searched for “shadow copy” but nothing comes up. I have found a few files called “Manifest – (backup Generation 1 or 2 or 3 etc.vaultx” but these files are all only 253kb.
I have been in contact with the Forever support team and they are trying to help me but I am not getting anywhere. I’m assuming you are based in the US?
Do you know of anyone in Australia that could help me?
Hi, Paula.
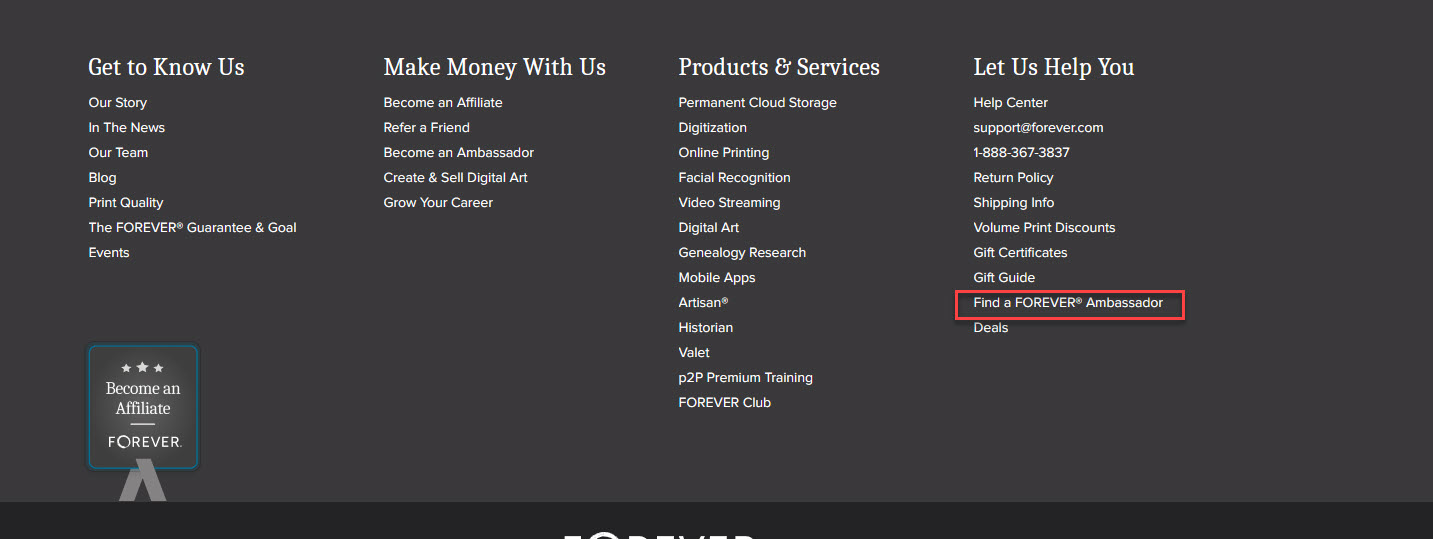
First of all, I don’t have a specific recommendation for someone who is an ambassador in Australia that you can reach out to. But, you can look up an ambassador who is close to you on the Forever.com site. If you scroll to the bottom of the page, you’ll see a link for Find a FOREVER Ambassador. If you click that link, you can do a search for someone local to you.
As far as finding the old vault, the whole vault would be a folder with whatever you had your vault named. There will be a Mainfest.vaultx file and probably multiple backup files with that name along with other folders. The issue will be that if you don’t recover the whole folder intact, your vault may be broken. The .vaultx files themselves should be inside a folder that contains all of the rest of your vault. It needs to all be ported to the new computer in that same folder structure without changing anything. I hope that makes some sense.
The .vaultx file is not something executable that you would double click on to get everything back. It’s the file inside of the whole vault folder that you would open with Historian to recover your vault.
Let me know if that helps at all or brings up more questions. Sorry for the time delay!
Deb
Can you open your memory vault using Google photos or something like that?
Hi, Nola.
The answer is no, and kind of. The way the vault is managed, it won’t open up all organized using Google Photos. You can’t go to the vault file and open it. However, each of the photo files in your vault is still accessible from your Windows Explorer, so in that sense, you can browse to each photo and open it in Google Photos if you really have to.
I save “have to” because if you want to maintain your vault in workable condition with Historian, you do not want to mess with those files outside of Historian or you risk breaking the ability of your vault to work with them or even find them in the software. Please backup your vault before trying anything like that.
A better option, if you want to be able to view your photos from your phone or another device, is to upload them to a Forever.com account from the software. It will send all of your tags and other information with the photo. You can try that out with a free account at Forever.com, or if you want a place to safeguard your photos without any worries about hard-drive crashes, data mining or deletion due to a lapse in subscription fees or a change in terms, you can check into the Forever permanent storage options. To try the free account option here: https://www.forever.com/ambassador/debrodriguez and then you’ll have a better idea if that works for you.
Deb